
Introduction
Keeping your kitchen clean is a way to maintain the beauty and comfort of your home. At Mesh Maids, we know that cleaning your drip pans can make a big difference. After carefully evaluating all possible cleaning methods, we’ve put together the best solution to help you remove tough grime, lift stubborn grease, and restore a brilliant shine to your stove. Whether you cook in a stylish space with white kitchen cabinets with black countertops, spotless drip pans instantly elevate the look and hygiene of your kitchen. In our opinion, cleaning them is easier than you think. To clean it, you need to simply remove the drip pans from the stove, soak them in hot soapy water, apply a baking soda and vinegar mixture or a trusted degreaser, let it sit, scrub gently, and rinse thoroughly before drying and placing them back on your stove.
We know that over time, drip pans collect everything, from oil splatters and sauce spills to burnt food residue. If drip pans are not cleaned properly, they not only look dull but can also affect how efficiently your stove performs. Many homeowners clean their counters, especially the gas stove oven, regularly, but forget about these small parts that catch all the spills and splatters. That’s why creating a simple, effective cleaning routine is essential. With the right approach, you can restore your drip pans using easy ingredients, quick steps, and professional tips.
In this guide, we walk you through the most reliable methods, expert techniques, and practical suggestions to bring back that like-new sparkle. Let’s help you achieve a kitchen that’s clean, inviting, and ready for your next meal.
What Are Drip Pans Actually?
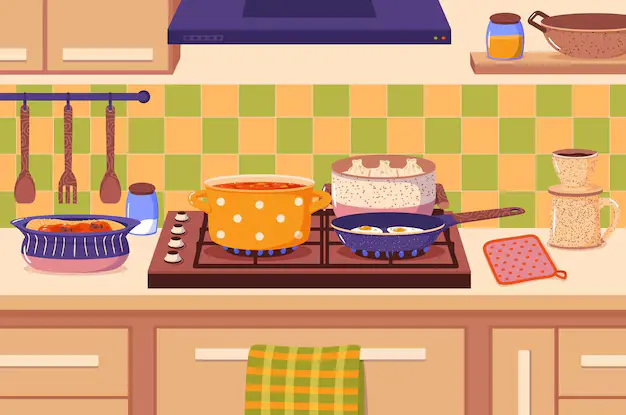
Drip pans are the removable metal trays that sit beneath the burners on your gas or electric stove. Its main purpose is to catch spills, grease splatters, and food drips that fall while you cook.
Why Do Drip Pans Get So Dirty?
Drip pans get dirty quickly because they sit directly under your stove burners, catching every spill, splash, and crumb while you cook. At Mesh Maids, we often notice that even the most graceful kitchens end up with greasy residue in these pans simply because cooking involves boiling, frying, simmering, and sautéing—all of which create splatters. Over time, heat from your burners bakes these spills onto the metal surface, causing them to harden and turn into stubborn grime. If you use your gas stove oven daily, the constant exposure to high temperatures and repeated spills makes the dirt build up even faster. And since drip pans are easy to overlook during regular cleaning, they tend to collect more residue than other kitchen surfaces.
Common Reasons Drip Pans Get Dirty
- Grease splatters: Oil from frying or sautéing lands directly onto the pans.
- Food spills: Sauces, soups, and liquids boil over and drip into the pans.
- Crumbs and debris: Small pieces of food fall during stirring or flipping.
- Heat buildup: High temperatures bake spills, making them sticky and hard.
- Infrequent cleaning: When drip pans aren’t cleaned regularly, residue hardens.
- Daily cooking habits: The more you cook, the faster grime accumulates.
Why Cleaning Drip Pans Matters
At Mesh Maids, we’ve spent years cleaning homes for families and clients across different communities, and one thing we consistently notice is how often drip pans are overlooked. Many homeowners don’t realize that these small trays play an important role in maintaining a clean, efficient, and long-lasting stove. From our point of view, clean drip pans are essential not only for appearance but also for the hygiene and performance of your entire kitchen. Once you understand why they matter, it becomes easier for you to build simple habits that make a big difference.
Keeps Your Kitchen Hygienic
Dirty drip pans become a hidden collection point for grease, spills, crumbs, and dried-up sauces. Over time, these trapped residues create unpleasant odors and even attract pests—something we’ve seen many clients struggle with before reaching out for help. When you keep your drip pans clean, you eliminate these hidden messes and make your cooking space fresher, safer, and more hygienic every day.
Improves Cooking Efficiency
From our experience maintaining countless stoves for our clients, we know how much grease buildup affects heat distribution. When grime hardens under the burners, your stove may heat unevenly, produce smoke, or take longer to cook your food. Clean drip pans help your burners function the way they’re meant to, allowing you to enjoy smoother, faster, and more efficient cooking—whether you’re boiling, frying, or simmering.
Extends the Life of Your Stove
A neglected set of drip pans can cause long-term damage. Hardened spills and burnt grease can lead to corrosion, rust, and permanent discoloration. Over the years, we’ve seen many stoves age faster simply because the drip pans weren’t cared for. By cleaning them regularly, you protect your stove’s appearance, prevent avoidable damage, and maintain its quality for years to come.
When you give a little attention to your drip pans, you’re doing more than making your stove look better—you’re supporting the hygiene, efficiency, and lifespan of your entire cooking area. After helping so many clients maintain bright and functional kitchens, we can confidently say that small, consistent steps create the biggest impact. With the right habits, you can enjoy a cleaner, smoother, and more inviting kitchen every single day.
What You Need Before You Start Cleaning
Essential Cleaning Supplies
Before you begin cleaning your drip pans, it’s important to gather all the supplies you’ll need. At Mesh Maids, we always recommend preparing everything in advance—this makes the process smoother, faster, and far more effective. Over the years, we’ve learned that having the right tools on hand helps you remove tougher grime with less effort and keeps your stove looking well-maintained.
Here’s what you should have ready:
- Dish soap
- Baking soda
- White vinegar
- Aluminum foil (optional)
- Scrub brush or old toothbrush
- Nylon scrub pad
- Microfiber towels
- Bowl or sink
- Degreaser or all-purpose cleaner
These supplies are safe for most stove surfaces and work well to break down grease, soften burnt residue, and lift hardened grime. With these essentials prepared, you can clean your drip pans quickly and achieve a smooth, shiny finish every time.
How to Clean Drip Pans: Step-by-Step Cleaning Procedure
Step 1 — Remove the Drip Pans
Before you begin, make sure your stove is completely turned off and the burners have cooled. Safety comes first—especially when dealing with metal parts that retain heat. Once everything is cool, gently lift the coils and slide out the drip pans. If you have a gas stove, simply remove the grates and lift the pans underneath. We always remind our clients to handle drip pans carefully to avoid bending or scratching them.
Step 2 — Pre-Soak the Drip Pans
Place the drip pans in a sink or large bowl filled with hot water and a few drops of dish soap. Let them soak for about 10–15 minutes. This simple step makes a major difference in the cleaning process, especially if you haven’t cleaned them in a while.
Why Pre-Soaking Works
Hot water softens hardened grease and loosens burnt food residue that sticks to the metal surface. From our experience cleaning homes for years, we know that pre-soaking cuts your scrubbing time in half and makes the rest of the cleaning steps much easier and faster.
Step 3 — Use Baking Soda and Vinegar
This natural cleaning duo is excellent for removing grime without harsh chemicals.
How to Apply
- Sprinkle a generous amount of baking soda on each drip pan.
- Pour white vinegar over the baking soda.
- Let the fizzing reaction work for about 10 minutes.
- Scrub using a brush or sponge.
Why Baking Soda + Vinegar Works
- Baking soda acts as a mild abrasive.
- Vinegar cuts through grease and dissolves residue.
- Together, they break down tough stains faster.
Step 4 — Scrub Stubborn Stains
Even after soaking, some drip pans may still have deep, cooked-on grime that refuses to lift. Don’t worry—this is completely normal, especially if you use your stove frequently. At Mesh Maids, we rely on a simple but powerful method to tackle these tough spots without damaging the surface.
Try This Heavy-Duty Method
- Mix baking soda with a small amount of water to create a thick cleaning paste.
- Apply the paste generously over the stubborn, stained, or burnt areas.
- Let it sit for 20–30 minutes so the paste can break down the residue.
- Scrub gently in circular motions using a nylon scrub pad or an old toothbrush.
This method works because baking soda is a natural abrasive—it lifts grime without scratching the drip pan surface.
Pro Tip
Avoid using steel wool or extremely abrasive pads on chrome or stainless-steel drip pans. They can easily scratch or dull the shine. Stick to nylon pads for a safe and effective clean.
Step 5 — Rinse and Dry
After scrubbing away the grime, rinse each drip pan thoroughly with warm water to remove all traces of baking soda, soap, and loosened residue. We always suggest taking a moment to check the corners and edges, as these areas tend to trap leftover grime. Once rinsed, dry the drip pans completely using a clean microfiber cloth. This not only prevents water spots but also helps maintain their shine and keeps rust from forming over time.
Step 6 — Reassemble Your Stove
When your drip pans are fully dry, it’s time to put everything back in place. Slide the pans under your coil burners or position them correctly beneath the grates if you have a gas stove. Make sure each piece sits firmly and aligns properly—this ensures even heating and keeps your stove functioning smoothly.
Many of our clients are surprised by how clean drip pans instantly make the entire stove look fresher and more polished, giving your kitchen a neat and inviting appearance.
How to Deep Clean Drip Pans: Deep Cleaning Methods
If your drip pans are covered in burnt-on stains that won’t budge, it’s time for deep cleaning. Here are two expert-approved methods.
Method 1 — Vinegar and Baking Soda Soak
Vinegar is a natural degreaser and works well with baking soda. Here’s how:
1. Remove and soak: Follow the basic method to remove pans and soak them in hot, soapy water first.
2. Make a solution: Drain the sink and refill with equal parts hot water and white vinegar. Soak the drip pans for 30–60 minutes.
3. Scrub: After soaking, sprinkle a generous amount of baking soda directly onto the pans. The fizzing reaction helps lift burnt spots.
4. Rinse and dry: Scrub, rinse, and dry completely.
Method 2 — Overnight Ammonia Bag Method (for Tough Burnt Grease)
For extreme buildup, professionals swear by the ammonia method — but handle it carefully.
1. Place in a bag: Put each drip pan in a large resealable plastic bag. Add about 1/4 cup of household ammonia (not mixed with anything else!).
2. Seal and leave overnight: The ammonia fumes (not the liquid) break down burnt grease.
3. Remove and rinse: The next day, open the bag in a well-ventilated area. Wearing gloves, remove the drip pans, rinse thoroughly, and scrub off any loosened grime.
4. Dry completely: Always dry drip pans fully to prevent rust.
Important: Never mix ammonia with other cleaners. Use this method only in a well-ventilated space and wear gloves.
Method 3 — Use a Kitchen Degreaser
If natural cleaning methods aren’t giving you the results you want, a professional kitchen degreaser can make the job much faster and easier. At Mesh Maids, we often recommend this option to clients with heavily soiled drip pans because degreasers are designed to break down thick, stubborn grease that regular soap or baking soda may not fully remove. This method is especially helpful when you need quick results without a lot of scrubbing.
How to Use
- Spray a generous, even coat of your kitchen degreaser over the entire drip pan surface.
- Allow it to sit for 5–10 minutes so it can dissolve the built-up grease and burnt residue.
- Scrub gently using a nylon scrub pad or brush.
- Rinse thoroughly with warm water to remove all chemical residue.
This method works quickly and leaves your drip pans looking cleaner with minimal effort.
Warning
Always check the product label before applying a degreaser to your drip pans. Some formulas may not be suitable for chrome, aluminum, or stainless steel.
If you’re facing the same issue, these pointers will guide you a lot in cleaning your drip pans.
It’s time to buy a new one. They’re affordable. You can easily purchase your drip pan online or at hardware stores, and make a big difference in your kitchen’s cleanliness.
How Often Should You Clean Drip Pans?
For a clean, safe, and odor-free kitchen, aim to:
- Wipe drip pans weekly to remove fresh spills.
- Deep clean drip pans once a month or sooner if you cook frequently.
- Inspect drip pans for rust or damage. If they’re too worn, replacing them is better than endless scrubbing.
Extra Kitchen Cleaning Tips to Keep Your Cooking Space Fresh
Drip pans are just one part of a clean, safe kitchen. Combine them with these extra steps:
Keep burners clean: Wipe and clean electric coils burners or gas grates weekly.
Clean under the stove: Food crumbs fall beneath the appliance too move it and vacuum underneath every few months.
Don’t forget the hood filter: A greasy range hood filter makes your kitchen smell stale — soak it in hot, soapy water monthly.
Use the right kitchen cleaning products: Gentle, non-abrasive products keep surfaces safe and your stove looking new.
Book regular deep cleans: If your kitchen gets really overwhelmed, hiring professional cleaning services every few months will be a better option for a healthier, more pleasant home.
How to Clean Chrome Drip Pans Without Damaging Them
Chrome drip pans add a sleek, polished look to your stove, but they also require a little extra care to maintain their shine. At Mesh Maids, we always remind our clients that chrome surfaces scratch easily, so using the wrong tools can dull the finish or even remove the protective coating. With the right approach, you can keep your chrome drip pans looking bright and spotless without causing any damage.
What to Avoid
To protect your chrome drip pans, avoid using harsh or overly abrasive tools. These can scratch the shiny surface and shorten the lifespan of your pans.
- Steel wool
- Harsh abrasive powders
- Sharp scrapers
These materials can leave visible scratches and strip away the protective coating, making your drip pans look worn out far too quickly.
Safe Cleaning Options
Here are gentle yet effective methods we recommend when cleaning chrome drip pans:
- Dish soap and hot water – Perfect for regular cleaning and removing light grease.
- Baking soda paste – A mild abrasive that lifts grime without scratching.
- Vinegar spray – Great for dissolving grease and restoring shine.
- Non-abrasive cleaners – Safe formulations that won’t harm chrome surfaces.
These options allow you to clean thoroughly while preserving the glossy finish.
Pro Tip
After cleaning, apply a little white vinegar to a microfiber cloth and gently buff the drip pans. This simple finishing step enhances the shine and removes any streaks.
Preventing Grease Buildup on Drip Pans
Keeping your drip pans clean is not an easy job. At Mesh Maids, we always remind our clients that a few simple habits can prevent heavy grease buildup and save them from scrubbing burnt grime later. With regular care and the right protective measures, your stove will stay cleaner, shine brighter, and work more efficiently every day.
Line with Aluminum Foil (Optional)
Many homeowners use aluminum foil to protect their drip pans from grease and spills. It’s a convenient option, but before you try it, make sure to check your stove’s manual—some manufacturers don’t recommend foil because it can affect airflow or heat distribution. If your stove allows it, lining the drip pans is an easy way to reduce the amount of deep cleaning needed.
How to Line Properly
- Cut a piece of foil slightly larger than the drip pan.
- Press it neatly inside and smooth out any wrinkles.
- Replace the foil every 1–2 weeks, or sooner if you cook often.
This method helps catch spills before they burn onto the metal, making cleaning quicker and easier.
Clean Spills Immediately
Small spills may not seem like a big deal, but once they burn onto your drip pans, they turn into stubborn stains. At Mesh Maids, we always encourage tackling these little messes right away. If you wipe off spills as soon as the stove cools, you’ll prevent them from hardening and save yourself time during your next deep clean.
Clean Drip Pans Weekly
A quick weekly wash can make a huge difference. With just a little dish soap and warm water, you can rinse away light grease before it hardens. From our experience, we can confidently say that this simple habit keeps your drip pans—and your entire stove—looking fresh and easier to maintain long-term.
Best 10 Kitchen Cleaning Hacks for Busy Homeowners
A sparkling kitchen doesn’t have to mean hours of scrubbing every week. Smart cleaning shortcuts that keep messes under control before they become major chores. Whether you’re a busy parent, a new homeowner, or someone who just loves an organized cooking space, these 10 kitchen cleaning hacks will save you time and keep your kitchen fresh with minimal effort.
1. Line Your Drip Pans
One of the simplest tricks for a cleaner stove is to line your electric drip pans with disposable foil liners. When spills and splatters happen, just remove the liner and replace it — no scrubbing needed.
2. Use Baking Soda Paste for Stubborn Stains
Baking soda is your best friend for tackling greasy messes. Make a paste with baking soda and a little water, spread it on burnt-on spots (like oven doors or gas oven stove tops), let it sit for 15–20 minutes, then wipe clean.
3. Clean as You Cook
Instead of facing a mountain of dirty dishes and splatters after dinner, tidy up while you cook. Wipe spills right away, load the dishwasher between steps, and soak pans as soon as you’re done with them — it all adds up to a faster post-meal clean.
Bonus Tip: A clean dishwasher means cleaner dishes! If you’re wondering how to clean dishwasher buildup and odors, run a hot cycle with vinegar and baking soda once a month to keep it fresh and functioning at its best.
4. Keep a Lemon Handy
Lemons are natural degreasers and deodorize your sink at the same time. Cut one in half and run it over your cutting board or garbage disposal to freshen up stubborn odors.
5. Use a Squeegee on Countertops
Spilled crumbs or water on your counters on your quartzite countertops. Use a small handheld squeegee instead of paper towels. It’s quicker, leaves no streaks, and cuts down on waste.
6. Degrease Cabinets with Dish Soap
Grease loves to cling to cabinets near your stove. Mix warm water with a drop of dish soap, wipe doors and handles weekly, and you’ll prevent sticky buildup before it becomes a big project.
7. Soak Microwave Messes
Microwave splatters can be a pain to scrub. Fill a bowl with water and a splash of vinegar, microwave for 2–3 minutes, then let the steam loosen stuck-on food. Wipe clean with a cloth — no elbow grease needed.
8. Use Vinegar to Shine Stainless Steel
Dull stainless steel appliances? A spritz of white vinegar followed by a wipe with a microfiber cloth removes fingerprints and brings back the shine.
9. Sweep or Vacuum Daily
It sounds simple, but sweeping or vacuuming your kitchen floor daily prevents crumbs, pet hair, and dust from getting tracked around the house. A quick once-over saves bigger messes later.
10. Schedule a Monthly Deep Clean
Even with smart daily habits, a regular deep clean keeps your kitchen truly fresh. Pick one day a month to tackle things like drip pans, the oven, fridge shelves, and cabinet doors. Keep an eye on your fridge, go for cleaning whenever you see something is not good like mold in your fridge.
Bonus Tip: Check here for the full guide on how to clean moldy fridge.
With these quick hacks, you’ll spend less time scrubbing and more time enjoying your clean, welcoming kitchen. And when life gets too busy? Professional help is always an option.
If you’re short on time or want a full refresh for your entire kitchen, don’t hesitate to contact us.
Conclusion: Make Your Drip Pans Shine Like New for a Long Time
Now you know how to clean drip pans, you’re ready to handle one of the kitchen’s most neglected spots. Whether you use the basic soap and scrub method or try overnight soak, you’ll get great results with a little patience and the right tools.
Remember: the best way to avoid the headache of scrubbing stubborn burnt messes is to clean drip pans regularly and tackle spills before they harden. Add them to your monthly kitchen deep cleaning routine, and they’ll stay looking brand new longer.
Book your deep clean with Mesh Maids and enjoy a sparkling kitchen and home from top to bottom.