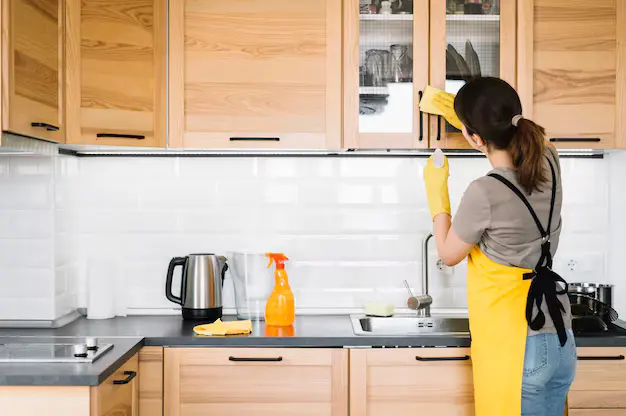
After years of cleaning homes, we’ve learned that the kitchen is more than just a cooking space. It plays a vital role in maintaining a healthy and inviting home. Over time, kitchen cabinets naturally accumulate grease and dust, making regular and proper cleaning essential for a healthy home environment. That’s why we focus on the most effective and safe solutions for cleaning them. You can clean your kitchen cabinets by using the right methods, correct techniques, and safe cleaning products. The process starts by dusting and removing loose debris, followed by applying a gentle degreasing solution made with mild dish soap or a cabinet-safe cleaner. Cabinets should always be wiped with a soft microfiber cloth, working with the grain to lift grease without scratching the surface. Use a clean, dry cloth to finish your cleaning, which helps prevent moisture damage and keeps cabinets looking polished and fresh in your home.
At Mesh Maids, we have been working in homes for years and helping our clients to maintain clean, healthy, and well-organized kitchens. We understand that every home and every cabinet material requires a careful approach. That is why we rely on proven cleaning techniques, eco-friendly products, and professional attention to detail to deliver consistent results for our clients.
In this guide, we share the same expert methods our professional cleaners use every day, along with practical advice you can easily apply at home. Whether you are tackling everyday grease in your kitchen or planning a deep house cleaning, these steps will help you protect your cabinets, extend their lifespan, and keep your kitchen looking its best.
Why Kitchen Cabinets Get Greasy and Dirty
We can’t ignore the fact that kitchen cabinets are constantly exposed to grease, moisture, and everyday cooking residue. Each time you prepare meals, tiny oil particles travel through the air and settle on nearby surfaces. Upper cabinets, especially those located near the stove and cooking range, are the most affected. Over time, this invisible buildup turns into visible grime, making cabinets look dull, sticky, and unhygienic.
From our experience, we have seen how quickly grease can accumulate when cabinets are not cleaned regularly. Even kitchens that appear tidy can have layers of grease hiding on cabinet doors, handles, and edges. If this is ignored, it becomes harder to remove and may even damage the cabinet finish.
Common Causes of Grease and Grime on Kitchen Cabinets
Several everyday habits contribute to greasy and dirty kitchen cabinets, often without you realizing it:
- Cooking oils and food splatter that spread during frying, sautéing, and baking
- Steam released from boiling and cooking, which softens grease and helps it stick to surfaces
- Touching cabinet doors with oily, wet, or unwashed hands while cooking
- Dust particles mixing with grease, creating a thick and sticky residue over time
We often notice that cabinet handles and corners collect the most grime because they are touched frequently throughout the day. These areas require extra attention during cleaning to restore a fresh and polished look.
As this grease and dirt continue to build up, they harden and become difficult to remove with simple wiping. That is why regular care and proper cabinet cleaning methods are essential. When you clean cabinets the right way and at the right time, you protect their appearance, maintain kitchen hygiene, and extend the life of your cabinets.
What to Consider Before Cleaning Kitchen Cabinets
Before you begin cleaning your kitchen cabinets, it is important to take a moment to understand what you are working with. Cabinets may look similar at first glance, but different materials react differently to cleaning products and techniques. When the wrong cleaner or method is used, it can cause permanent damage such as discoloration, peeling, or dulling of the finish. From our experience working in homes for years, we know that proper preparation is the key to safe and effective cabinet cleaning.
Identify the Cabinet Material
One of the first steps in cabinet cleaning is identifying the material and finish. This helps you choose the right cleaning products and techniques, ensuring effective results without harm.
- Wood cabinets – These may be solid wood or wood veneer and require gentle cleaners to avoid stripping natural oils or damaging the grain.
- Painted cabinets – Available in gloss, semi-gloss, or matte finishes, painted cabinets need non-abrasive products to prevent chipping or fading.
- Laminate cabinets – Common in modern kitchens, laminate surfaces are durable but can swell or peel if exposed to excess moisture.
- Glass-front cabinets – Decorative and delicate, these cabinets require careful handling and streak-free cleaning solutions to maintain clarity and shine.
Each cabinet type requires a slightly different approach, and we will guide you through the correct methods for each material in the sections ahead. When you know what your cabinets are made of, cleaning becomes safer, easier, and far more effective.
Test Before You Clean
No matter which cleaning product you plan to use, testing it first is essential. We always recommend applying the solution to a small, hidden area—such as the inside edge of a cabinet door—to check for any unwanted reactions. This simple step helps you ensure that the cleaner will not discolor, damage, or dull the cabinet finish.
Taking the time to test before cleaning gives you confidence and protects your cabinets from costly mistakes. When you follow this careful approach, you maintain both the beauty and longevity of your kitchen cabinets while achieving professional-level results at home.
What are the Essential Supplies for Cleaning Kitchen Cabinets
You do not need expensive or harsh products to remove grease and grime from kitchen cabinets. In most homes, the right tools and cleaning solutions are already available. From our experience and working in kitchens of all types, we have found that simple, safe supplies are often more effective than strong chemical cleaners. When you use the right combination of tools and products, you can clean cabinets thoroughly without damaging their finish.
Basic Cleaning Tools
Using the correct tools helps you clean efficiently while protecting cabinet surfaces from scratches or wear.
- Soft microfiber or cotton cloths – These are ideal for wiping surfaces, lifting grease, and drying cabinets without leaving streaks or lint.
- Soft sponge or non-abrasive scrub pad – Useful for loosening stubborn grime while remaining gentle on cabinet finishes.
- Small bucket – Helps you mix cleaning solutions and control the amount of water used during cleaning.
- Old toothbrush – Perfect for reaching corners, grooves, hinges, and cabinet handles where grease tends to build up.
We often see grease collecting in small, hard-to-reach areas, and having the right tools makes a noticeable difference in how clean your cabinets look after the job is done.
Safe Cleaning Solutions
Choosing safe and gentle cleaning solutions is just as important as using the right tools. These options work well for most cabinet materials when used correctly.
- Warm water – Effective for loosening light grease and dust during regular cleaning.
- Mild dish soap – Helps break down oily residue without harming cabinet finishes when diluted properly.
- White vinegar – Useful for cutting through grease and removing sticky buildup, especially when mixed with water.
- Baking soda – Ideal for tough grease and stains when used sparingly as a gentle scrubbing aid.
We recommend using these solutions carefully and in moderation. When you pair them with proper techniques, you can achieve professional-quality results while keeping your cabinets safe, clean, and well-maintained.
How to Clean Kitchen Cabinets: Step-by-Step Instructions
Cleaning kitchen cabinets becomes much easier and more effective when you follow a structured approach. Working in homes for years, we have learned that breaking the process into simple steps helps you achieve better results while protecting cabinet surfaces. Follow these steps carefully to remove grease, dirt, and buildup without causing damage.
Step 1: Empty the Cabinets
Begin by removing all items from inside the cabinets. This gives you full access to shelves, corners, and cabinet walls, allowing for thorough cleaning. Emptying the cabinets also prevents moisture, cleaning solutions, or falling debris from damaging dishes, cookware, or stored food. We recommend placing items on a clean surface and wiping them down if needed before putting them back.
Step 2: Dry Dust First
Before using any liquid cleaner, use a dry microfiber or cotton cloth to remove loose dust, crumbs, and debris. This step is often overlooked, but it is essential. When grease is cleaned without dusting first, dirt can spread and smear across the surface, making cleaning more difficult. We always advise starting dry so you can clean more efficiently and avoid unnecessary mess.
Step 3: Prepare a Gentle Cleaning Solution
Next, prepare a mild yet effective cleaning solution by mixing a few drops of mild dish soap with warm water. This mixture is safe for most cabinet finishes and works well to break down grease and oily residue. Avoid using harsh chemicals or overly concentrated solutions, as they can damage the cabinet surface over time. When used correctly, this gentle solution provides reliable results for everyday cabinet cleaning.
How to Remove Grease from Kitchen Cabinets Naturally
Removing grease from kitchen cabinets does not require harsh chemicals. In many homes, natural cleaning methods are both effective and safer for cabinet finishes. From our experience working in kitchens of all sizes, we have found that gentle, natural solutions can break down grease while preserving the look and durability of your cabinets. When you use the correct technique and apply the solution carefully, you can achieve clean, grease-free cabinets without risk of damage.
Dish Soap and Warm Water Method
Mild dish soap is specifically designed to cut through grease, which makes it one of the most reliable options for cabinet cleaning. When diluted properly, it is safe for most cabinet materials and works well for everyday grease buildup.
How to use this method:
- Dip a soft microfiber or cotton cloth into the warm, soapy water
- Wring out excess water to avoid soaking the cabinet surface
- Gently wipe the cabinets, following the grain for wood finishes
- Use a clean, damp cloth to remove any soap residue
- Dry the surface immediately with a soft, clean towel
We recommend working in small sections so you can control moisture and ensure even cleaning. Drying right away helps prevent water marks and protects the cabinet finish.
Vinegar and Water Solution
White vinegar is a natural degreaser that helps dissolve sticky residue and built-up grime. This method works best when grease has hardened over time and requires extra attention.
Best suited for: Painted and laminate cabinets
Avoid using on: Unsealed or delicate wood surfaces
Simple recipe:
- 1 part white vinegar
- 1 part warm water
Lightly spray the solution onto a cloth rather than directly onto the cabinets. Wipe gently, focusing on greasy areas, and avoid oversaturating the surface. We advise following up with a damp cloth if needed and drying the cabinets thoroughly to maintain a clean and polished look.
Using these natural methods allows you to clean effectively while keeping your cabinets safe, fresh, and well-maintained.
How to Clean Wood Kitchen Cabinets Safely
Wood kitchen cabinets add warmth and elegance to your home, but they require extra care during cleaning. Wood is a natural material that can absorb moisture, making it more vulnerable to warping, swelling, or dullness if cleaned incorrectly. From our experience working in homes for years, we know that using the right technique and products is essential to preserve the beauty and durability of wood cabinets.
Recommended Method for Cleaning Wood Cabinets
To clean wood cabinets safely, it is important to keep the process gentle and controlled.
- Use a mild dish soap mixed with warm water to break down grease without stripping natural oils
- Dip a soft cloth into the solution and wring it out well so it is only slightly damp
- Wipe the cabinet surface gently, always following the direction of the wood grain
- Focus on high-touch areas such as handles and edges, where grease tends to build up
- Dry the cabinets immediately with a clean, soft towel to prevent moisture from seeping into the wood
We recommend cleaning in small sections so you can control moisture and ensure even results.
What to Avoid When Cleaning Wood Cabinets
Using the wrong products or methods can damage wood cabinets over time. To protect your cabinets, avoid the following:
- Excess water or soaking the surface
- Harsh chemicals that can strip the finish or cause discoloration
- Abrasive scrubbers or rough pads that may scratch the wood
We often see cabinet damage caused by overcleaning or using strong products that are not designed for wood surfaces.
Extra Care Tip for Long-Lasting Shine
Once your cabinets are clean and completely dry, you can apply a small amount of wood polish or mineral oil using a soft cloth. This extra step helps restore natural shine, nourishes the wood, and creates a light protective layer against future grease and moisture. When done occasionally, this simple care routine keeps your wood cabinets looking rich, smooth, and well-maintained for years.
How to Clean Painted Kitchen Cabinets
Painted kitchen cabinets add a clean and modern look to your home, but they tend to show grease, smudges, and fingerprints more easily than other finishes. Areas around handles, edges, and frequently touched surfaces are especially prone to buildup. From our experience working in homes, we know that painted cabinets require a gentle yet consistent cleaning approach to maintain their color and finish.
Best Cleaning Approach for Painted Cabinets
Using mild products and soft tools helps remove grease without damaging the paint.
- Mix warm water with a small amount of mild dish soap to create a gentle cleaning solution
- Use a soft microfiber cloth or non-abrasive sponge to avoid scratching the surface
- Wipe the cabinets using gentle circular motions to lift grease and fingerprints evenly
- Pay extra attention to high-touch areas such as handles and corners
We recommend working in small sections and rinsing the cloth frequently to prevent spreading dirt or residue.
Handling Stubborn Grease and Spots
For areas with stubborn grease or marks that do not come off easily, a light paste made from baking soda and water can be used carefully. Apply the paste with a soft cloth, rub gently, and avoid excessive pressure. This method should only be used on durable painted finishes, as delicate or matte surfaces may scratch or lose their sheen.
After cleaning, wipe the cabinets with a clean, damp cloth to remove any residue and dry thoroughly. When you follow this careful method, your painted cabinets stay fresh, smooth, and visually appealing without risking damage to the paint.
How to Clean Laminate Kitchen Cabinets
Laminate kitchen cabinets are popular for their durability and modern appearance, but they still require careful cleaning. While laminate surfaces can handle regular use, they can scratch, dull, or peel if scrubbed too harshly or exposed to excess moisture. From our experience working in homes, we know that gentle cleaning and proper drying are essential to keep laminate cabinets looking clean and well-maintained.
Cleaning Steps for Laminate Cabinets
Following the right steps helps remove grease without damaging the laminate surface.
- Wipe the cabinets using a soft cloth dipped in warm, soapy water
- Clean gently to lift grease and dirt without applying heavy pressure
- Pay close attention to seams and edges, where moisture can cause lifting or swelling
- Avoid soaking the surface or allowing water to sit for long periods
- Dry the cabinets thoroughly with a clean towel to prevent water marks and damage
We recommend working in small sections so you can control moisture and ensure even cleaning.
What to Avoid on Laminate Surfaces
Laminate cabinets can be damaged easily by the wrong tools or products. To protect the surface, never use steel wool, abrasive scrubbers, or harsh chemical cleaners. These can scratch the laminate, remove its protective layer, and reduce its lifespan.
When you clean laminate cabinets using gentle products and proper techniques, you maintain their smooth finish and keep your kitchen looking fresh and tidy for years to come.
How to Clean Glass Kitchen Cabinet Doors
Glass kitchen cabinet doors add elegance and openness to your kitchen, but they also require streak-free cleaning to maintain a polished and spotless appearance. Fingerprints, grease, and dust are more visible on glass surfaces, especially in frequently used kitchens. From our experience working in homes, we know that the right technique makes a noticeable difference in achieving clear, smear-free results.
Cleaning Tips for Glass Cabinet Doors
Using the correct method helps you clean effectively without leaving streaks or residue.
- Use a vinegar and water solution or a gentle glass cleaner suitable for household use
- Always spray the cleaning solution onto a cloth rather than directly onto the glass to prevent drips and oversaturation
- Wipe the glass using straight, even strokes instead of circular motions to reduce streaking
- Dry the surface immediately with a clean, lint-free cloth for a clear finish
We also recommend cleaning the cabinet frames first, especially if they are wood, painted, or laminate. This prevents dirt or grease from transferring onto the freshly cleaned glass and helps you achieve a cleaner final result.
When you follow these simple steps, glass cabinet doors stay clear, bright, and free from streaks, enhancing the overall look of your kitchen.
How to clean Handles, Knobs, and Cabinet Hardware
Cabinet handles, knobs, and other hardware are some of the most frequently touched areas in your kitchen. Because of constant contact, these surfaces tend to collect grease, food residue, and bacteria more quickly than cabinet doors. From our experience working in homes, we know that even well-cleaned cabinets can look dirty if the hardware is neglected. Giving special attention to these areas improves both cleanliness and overall kitchen hygiene.
Deep Cleaning Method for Cabinet Hardware
For a thorough and effective clean, removing the hardware whenever possible allows you to reach every surface.
- Carefully remove handles or knobs using the appropriate tool
- Soak the hardware in warm, soapy water for 10 to 15 minutes to loosen grease and buildup
- Gently scrub using an old toothbrush to clean crevices and edges
- Rinse thoroughly with clean water to remove soap residue
- Dry completely with a clean towel before reinstalling
We recommend ensuring the hardware is fully dry before placing it back on the cabinets to prevent moisture-related damage or rust.
Cleaning Hardware Without Removal
If removing the hardware is not possible, you can still clean it effectively. Use a damp cloth with a mild cleaning solution and carefully wipe around and behind the hardware. A toothbrush or cotton swab can help reach tight areas where grease often accumulates.
When you include cabinet hardware in your cleaning routine, you create a noticeably cleaner, fresher, and more hygienic kitchen environment.
How to Tackle Stubborn Grease and Grime on Kitchen Cabinets
Over time, grease and grime can harden on kitchen cabinets, making them difficult to remove with regular cleaning methods. These stubborn areas are commonly found around cooking zones, cabinet handles, and edges. From our experience working in homes, we know that tougher buildup requires a careful approach using the right techniques, without risking damage to cabinet surfaces.
Baking Soda Paste for Heavy Grease
Baking soda is a gentle, natural abrasive that works well for breaking down thick grease when used correctly.
- Mix baking soda with a small amount of water to form a smooth paste
- Apply the paste gently to the greasy area using a soft cloth
- Rub lightly without applying pressure to avoid scratching the surface
- Wipe the area clean with a damp cloth
- Dry thoroughly with a clean towel
We recommend using this method sparingly and only on durable finishes. Always test the paste on a hidden area before applying it to visible surfaces.Whja
Steam Cleaning (With Caution)
Steam can be effective in loosening hardened grease, especially in heavily used kitchens. However, steam must be used with caution. Excess heat and moisture can damage cabinet finishes, particularly wood or laminate.
If you choose to use steam, keep the exposure brief and avoid holding steam in one spot for too long. Wipe the surface immediately after steaming and ensure it is completely dry. We generally advise avoiding steam on wood cabinets unless handled by professionals, as improper use can lead to warping or finish damage.
When used carefully, these methods help restore cleanliness while protecting your kitchen cabinets from unnecessary wear.
What are the Common Mistakes to Avoid When Cleaning Kitchen Cabinets
Cleaning kitchen cabinets may seem like an easy task, but small mistakes can lead to long-term damage. From our expertise, we have seen how improper techniques and product choices can shorten the life of cabinets and affect their appearance. Avoiding these common errors helps you maintain clean, attractive, and well-protected cabinets.
Using Too Much Water
Excess water is one of the most common causes of cabinet damage. When too much moisture is used, water can seep into cabinet joints, seams, and edges. Over time, this can cause swelling, warping, or peeling, especially in wood and laminate cabinets. We recommend always wringing out cleaning cloths well and using only minimal moisture during the cleaning process.
Skipping the Drying Step
Failing to dry cabinets after cleaning can leave behind streaks, water marks, and residue. Moisture left on the surface may also weaken the cabinet finish over time. Always dry cabinets immediately using a clean, soft cloth. This simple step helps preserve the finish and gives your cabinets a clean, polished appearance.
Using Harsh Chemicals
Strong cleaning products such as bleach, ammonia, or heavy-duty degreasers can strip protective finishes and cause discoloration. While these products may remove grease quickly, they often do more harm than good. We recommend sticking to mild, cabinet-safe cleaning solutions that clean effectively without damaging the surface.
By avoiding these common mistakes, you protect your cabinets and ensure they remain functional, hygienic, and visually appealing for years to come.
How Often Should You Clean Kitchen Cabinets?
Keeping kitchen cabinets clean is not only about appearance but also about maintaining hygiene and protecting the cabinet finish. From our experience working in homes, we know that following a regular cleaning schedule makes cabinet care easier and prevents stubborn grease from building up over time. When you clean cabinets consistently, you reduce the need for heavy scrubbing and harsh methods.
Regular Maintenance Cleaning
Routine cleaning helps control grease and dust before they settle into the cabinet surface.
- Light wipe-down: Once a week, use a soft cloth and a gentle cleaning solution to remove surface grease, fingerprints, and dust
- Spot cleaning: Clean spills, splashes, and greasy marks as soon as they appear to prevent staining or buildup
We recommend paying extra attention to high-touch areas such as handles, edges, and cabinets near the stove, as these areas collect grease more quickly.
Deep Cleaning Schedule
In addition to regular maintenance, deeper cleaning is necessary to remove hidden grime and restore freshness.
- Deep cleaning: Every 3 to 6 months
- Clean more frequently if you cook often, fry food regularly, or use your kitchen daily
Regular maintenance prevents heavy grease buildup and reduces the need for aggressive cleaning techniques. When you follow a consistent schedule, your cabinets stay cleaner, last longer, and maintain their original finish with less effort.
When to Consider Professional Kitchen Cleaning
While regular home cleaning works well for everyday maintenance, there are times when grease buildup becomes too stubborn for DIY methods. At Mesh Maids, we know that deeply embedded grease, neglected cabinets, and hard-to-reach areas often require professional attention. When cleaning feels overwhelming or results are no longer effective, it may be time to seek expert support.
Professional cleaning services are designed to handle heavy buildup safely and efficiently. With the right tools, techniques, and products, professionals can:
- Remove deeply embedded grease that regular cleaning cannot break down
- Clean hard-to-reach areas such as cabinet tops (especially your white cabinets with black countertops), corners, edges
- Protect cabinet finishes by using material-specific cleaning methods
- Save you time and effort while delivering consistent, high-quality results
Book now and let our experienced cleaners bring freshness back to your home. Professional kitchen deep cleaning is especially helpful during move-outs, renovations, or seasonal deep cleans, when kitchens require extra attention. Choosing professional cleaning services like Mesh Maids for cleaning your kitchen ensures your cabinets and surfaces are thoroughly cleaned, well-protected, and restored to a fresh and hygienic condition without the risk of damage. You should also clean your burnt stainless steel pot for a fresh and hygienic look of your kitchen. Get in touch with us to discuss your kitchen or home cleaning needs.
Conclusion: How to Clean Kitchen Cabinets for a Grease-Free Kitchen
Knowing how to clean kitchen cabinets properly makes a noticeable difference in the look, hygiene, and longevity of your kitchen. With the right tools, gentle cleaners, and consistent care, removing grease and grime does not have to be difficult or time-consuming.
By following the steps in this guide, like identifying your cabinet material, using safe cleaning solutions, and avoiding common mistakes, you can keep your cabinets looking fresh and well-maintained year-round.
A clean kitchen starts with clean cabinets. With regular care and the right approach, your kitchen can remain a welcoming, grease-free space that reflects both cleanliness and comfort. Book your cleaning services now and let our experienced cleaners bring freshness back to your home.