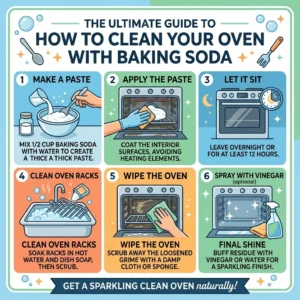
To clean your oven with baking soda, first make sure it is completely cool and remove all racks and trays. Then mix baking soda with a little water to form a thick paste and apply it all over the inside surfaces, especially on greasy and stained areas, while avoiding the heating elements. Let this paste sit for 8–12 hours or overnight so it can properly loosen the built-up grime. After waiting, wipe everything off using a damp cloth or sponge to remove the dirt and dried paste. For better results, you can spray a small amount of vinegar to break down any leftover residue and wipe it clean again. Finally, once the oven is dry, put the racks back in place and your oven will be clean and fresh to use.
At Mesh Maids, we’ve evaluated every possible cleaning method from harsh chemical sprays to self-cleaning methods, and what we’ve found is that baking soda is the most reliable option for a fresh, clean oven without strong fumes or unnecessary effort.
That’s why bring in this guide to help you clean smarter, not harder, with the simplest method that is safe for you and your home. In this guide, we’ll walk you through the step-by-step process of how to clean your oven with baking soda, along with helpful tips from our professional cleaners at Mesh Maids.
Why Baking Soda Is the Best Choice for Oven Cleaning

Cleaning your oven with baking soda may sound old-fashioned, but in our experience, it consistently outperforms many modern chemical cleaners. Baking soda is mildly abrasive and naturally alkaline. This unique combination allows it to break down stubborn grease, soften burnt food particles, and remove lingering odors without scratching or damaging the interior of your oven.
With years of hands-on experience in professional kitchen cleaning, we’ve seen how this simple ingredient effectively removes stubborn grease.
Bonus Tip – To keep your kitchen clean, you should follow a complete kitchen cleaning checklist.
Benefits of Using Baking Soda for Oven Cleaning
Non-toxic and safe
Baking soda is a natural, food-safe cleaner that allows you to clean your oven without harmful fumes or chemical residues. In our experience, we’ve seen clients prefer it because it is safe to use around children and pets.
Effective against grease and grime
Its gentle abrasive nature helps lift stubborn baked-on grease and grime with ease. We’ve noticed it works especially well on tough layers that regular cleaning products often fail to remove.
Affordable and accessible
A single box of baking soda is inexpensive yet highly effective for complete oven cleaning. We often recommend it as a budget-friendly solution that delivers strong cleaning results.
Odor neutralizer
Baking soda doesn’t just clean—it also removes lingering food odors trapped inside the oven. We’ve found it leaves kitchens smelling noticeably fresher after use.
Eco-friendly alternative
It is a safe, environmentally friendly option that avoids harsh chemicals and fumes. We’ve seen people choosing it as a greener way to maintain a clean kitchen.
From our point of view, considering safety, effectiveness, affordability, and eco-friendliness, baking soda is the ultimate solution for keeping your oven clean and fresh without unnecessary stress or cost.
How to Clean Your Oven with Baking Soda – Step-by-Step Guide
In our experience, many clients feel overwhelmed by baked-on grease and stubborn oven residue, but the right preparation makes it much easier. With a simple ingredient like baking soda and a clear process, we’ve observed that we can quickly restore the oven to a clean, fresh, and shiny condition.
What You Need to Clean Your Oven with Baking Soda
Having everything ready before you begin makes the cleaning process smoother and far less stressful.
Cleaning Supplies Checklist to Clean Oven
- Baking soda – the star ingredient for breaking down grease and grime
- Water – to form a paste with the baking soda
- White vinegar (optional but effective) – helps remove tough stains and adds extra shine
- Spray bottle – useful for applying vinegar or water evenly
- Small or medium bowl – for mixing your baking soda paste
- Cleaning gloves – to protect your hands from prolonged contact with grime
- Spatula or plastic scraper – to lift off stubborn residue without scratching surfaces
- Soft cloth or microfiber towel – for wiping down and polishing
- Sponge – for general cleaning and applying the paste
- Scrubbing brush (optional) – for extra stubborn spots or oven racks
Once you have all your supplies ready, you’re set to clean your oven.
Step 1 – Preparing Your Oven
Safety comes first. Make sure to turn off and unplug your oven. If it has been recently used, allow it to cool completely.
Remove Oven Racks
Start by removing the oven racks and placing them aside so you can clean them separately for better results. We’ve observed that racks are often the most neglected yet dirtiest part of the oven. Soaking them in warm, soapy water or using a baking soda paste removes the stubborn grime effectively.
Wipe Out Loose Debris
Next, use a dry cloth or paper towel to remove crumbs, food particles, and ash from inside the oven. We’ve noticed that skipping this step reduces the effectiveness of the baking soda paste, so a quick wipe makes the entire cleaning process easier and more efficient.
Step 2 – Make the Baking Soda Cleaning Paste
The baking soda paste is the heart of the oven cleaning process. Its thick, spreadable texture allows it to cling to surfaces, break down stubborn grime, and soften charred food particles, making your cleaning far more effective.
Baking Soda Paste Recipe to clean Oven
To make the paste, mix the following:
- ½ cup baking soda
- 2–3 tablespoons of water
Add the water gradually, stirring continuously until you achieve a thick, spreadable consistency—similar to toothpaste. The paste should be easy to apply with a spatula or cloth, yet thick enough to stay on vertical surfaces like the oven walls without dripping.
Optional Additions
While the basic baking soda and water paste works exceptionally well on its own, you can customize it for extra cleaning power:
- A few drops of dish soap – helps cut through heavy grease faster
- A splash of vinegar – produces a gentle foaming action for tougher stains
From our point of view, these optional additions are useful for heavily soiled ovens or ovens that haven’t been cleaned in months. However, for most clients, the standard paste is sufficient to get excellent results safely and effectively.
Pro Tip from Mesh Maids: Always prepare just enough paste for one cleaning session. Freshly made paste works best, and you’ll get maximum cleaning power without any drying or clumping issues.
Step 3 – Apply the Paste Inside the Oven
Wear cleaning gloves and spread the baking soda paste evenly across the oven’s interior surfaces, including the bottom, sides, and back, while avoiding the heating elements. We’ve observed that using a soft brush or spatula helps reach corners and tight areas, which are often missed but essential for a proper deep clean.
What Happens During Application
As you apply the paste, it may turn slightly brownish, which is completely normal and shows that it is breaking down grease and burnt-on residue. In our experience, this change is a positive sign that the baking soda is actively working to lift tough buildup.
Step 4 – Let the Paste Sit Overnight
To achieve the best results, allow the baking soda paste to work for at least 12 hours or overnight. During this time, it softens stubborn buildup and gradually dissolves layers of grease. You don’t need to check on it or touch it, just let the alkaline magic happen while you go about your day or sleep.
Pro Tip from Mesh Maids: For particularly greasy ovens, leaving the paste on slightly longer can make the wiping stage much easier.
Step 5 – Wipe the Oven Clean
After this, use a damp cloth to wipe away as much of the dried baking soda paste as possible. For tougher spots, gently use a plastic scraper to lift off the loosened grime. Take your time to ensure that all surfaces are thoroughly cleaned.
Rinsing the Interior
Once the bulk of the paste is removed, use a clean, wet cloth to wipe the oven interior. Repeat this process until no baking soda residue remains. At Mesh Maids, we always emphasize thorough rinsing, it ensures your oven is not only clean but also safe for cooking.
Step 6 – Use Vinegar Spray for a Final Shine
For a finishing touch, fill a spray bottle with white vinegar and lightly mist the oven interior. When the vinegar contacts any leftover baking soda, it will fizz, helping to remove the final traces of residue. Wipe the oven again with a clean cloth until all surfaces are smooth, streak-free, and completely clean.
Expert Tip: This final step also helps neutralize any lingering odors, leaving your oven smelling fresh and ready for your next meal.
Baking soda is one of the safest ways to clean your microwave, yet you can also explore different effective methods to clean your microwave and keep it fresh, hygienic, and odor-free.
How to Clean Oven Racks with Baking Soda and Vinegar

Oven racks often get overlooked, but they accumulate grease, burnt drips, and sticky residue over time. Cleaning them separately ensures your entire oven is fresh, hygienic, and fully restored. In our experience, clients are often surprised by how much grime racks can hold, and once cleaned, they make a noticeable difference in the overall oven cleanliness.
Step-by-Step Method To Clean Oven Racks
- Place the racks in your kitchen sink or bathtub – Choose a space that can comfortably hold them and allow for soaking.
- Sprinkle baking soda all over the racks – Make sure to coat every surface, including the edges and corners, where grease tends to accumulate.
- Pour vinegar over the racks – The mixture will immediately start to foam, helping to break down grease and residue naturally.
- Fill the sink or tub with warm water – Ensure the racks are fully submerged for an even, effective clean.
- Let them soak – Allow the racks to sit for at least 4–6 hours, or overnight for especially tough, baked-on grime.
- Scrub with a sponge or brush – After soaking, most grease and residue should lift easily. Focus on any remaining stubborn spots.
- Rinse and dry completely – Make sure all baking soda and vinegar residue is washed off. Drying thoroughly prevents rust and keeps racks looking like new.
This simple soaking method dissolves grease naturally without excessive scrubbing, saving you time and effort. From our point of view, it’s a reliable, safe, and effective way to restore your oven racks to a like-new condition.
How to Clean Your Oven Door with Baking Soda
Oven doors collect fingerprints, grease splashes, and stubborn brown stains over time. A clean oven door not only improves the appearance of your kitchen but also helps you monitor your cooking more effectively.
For the Interior Glass
- Apply the baking soda paste directly onto the glass – Use a soft cloth or sponge to spread a thin, even layer.
- Let it sit for 20–30 minutes – This allows the paste to soften grease, grime, and baked-on stains.
- Wipe clean with a damp cloth – Gently remove the paste along with loosened residue.
- Use a vinegar spray to remove streaks – Lightly mist the glass and wipe with a clean microfiber cloth to achieve a streak-free shine.
This method is gentle enough to prevent scratches while effectively removing stubborn stains from the interior glass.
For the Exterior Glass
- Dampen a microfiber cloth and apply a small amount of baking soda.
- Wipe the exterior glass in circular motions – Focus on fingerprints, grease marks, and any visible smudges.
- Finish with vinegar or a glass cleaner – This helps achieve a streak-free, polished finish that looks as good as new.
From our experience cleaning homes for years, clients often find that maintaining both the interior and exterior of the oven door regularly makes deep cleaning much faster and keeps the kitchen looking pristine.
How to Remove Tough Stains and Burnt-On Grease
Even with regular cleaning, some food spills and baked-on stains can be stubborn to remove. We’ve noticed that many clients face the same issue, but baking soda still offers a safe and effective way to handle them. With a few simple tricks, you can easily tackle these tough spots without harsh chemicals or hard scrubbing.
The Baking Soda + Vinegar Scrub
For particularly stubborn spots, try combining baking soda with a small amount of vinegar to create a foaming scrub. Apply this mixture directly to the tough area and let it sit for about 10 minutes. The fizzing action helps break down grease and baked-on residue. Afterward, scrub gently with a sponge or soft brush, then wipe clean with a damp cloth.
This method is highly effective for spots that resist the regular baking soda paste and gives excellent results without damaging your oven surfaces.
Hot Water Steam Trick
Another trick we often recommend for stubborn grime is using steam to loosen baked-on grease:
- Place an oven-safe bowl of hot water inside the oven.
- Turn the oven on to a low temperature and let it heat for about 10 minutes.
- Turn off the oven and let it cool slightly so it’s safe to handle.
- Apply your baking soda paste to the stained areas.
The steam helps soften and loosen the grime, making it much easier to remove. In our point of view, combining gentle steaming with baking soda ensures even the toughest stains come off with minimal effort.
Pro Tip from Mesh Maids: Always test a small area first when using any stronger method, and avoid scrubbing too hard to prevent scratching the oven’s interior.
Safety Tips When Cleaning Your Oven
While baking soda is a safe, natural cleaner, oven cleaning still requires some basic precautions to protect yourself and your appliance. From our years of cleaning homes, we’ve seen that following a few simple safety steps makes the process smoother, faster, and stress-free.
- Avoid applying paste to heating elements – Baking soda is effective on most surfaces, but coating the heating elements can cause damage or reduce efficiency.
- Always let the oven cool completely before cleaning – A hot oven can cause burns and prevent the baking soda paste from sticking properly.
- Wear gloves – Protect your hands from grime, grease, and prolonged contact with cleaning solutions.
- Ensure no baking soda residue remains – Before turning the oven back on, wipe thoroughly so that no leftover paste could burn or produce smoke.
By keeping these precautions in mind, you can clean safely and efficiently, ensuring your oven is spotless without any risk. In our point of view, safety always comes first, and these simple steps help you maintain both your oven and your peace of mind.
How Often Should You Clean Your Oven?
Maintaining a regular oven cleaning schedule is key to preventing deep buildup, unpleasant odors, and reduced efficiency. We always recommend creating a routine that fits your cooking habits so you can keep your oven looking and performing its best without feeling overwhelmed.
Recommended Frequency
- Light use: Clean every 3–4 months – For ovens that are used occasionally, this schedule keeps minor spills and grease from turning into stubborn buildup.
- Regular use: Clean every 1–2 months – For families or individuals who cook frequently, regular cleaning prevents grime from accumulating and makes deep cleaning easier.
- Heavy use or frequent baking: Clean once a month – If you bake often or cook large meals regularly, monthly cleaning keeps your oven in top shape and prevents hard-to-remove stains
Using baking soda makes frequent cleaning simple and stress-free because it is gentle, non-toxic, and effective. Unlike harsh chemical cleaners, you can safely clean your oven more often without worrying about fumes, residue, or damage to surfaces.
Pro Tip from Mesh Maids: A quick wipe-down with a damp cloth after each use can extend the time between deep cleans and keep your oven looking fresh.
When to Call Professional Cleaners
Even with the most effective DIY methods, you may require the expertise of professional cleaners. Clients often call for professional help when grease has built up over several layers or when burnt spills refuse to come off despite multiple attempts with baking soda and vinegar.
If your oven still looks dirty after following DIY cleaning steps, or if there is deep, stubborn grime in hard-to-reach areas, it’s a good idea to consider professional cleaning. We use specialized techniques and safe cleaning solutions to restore your oven to like-new condition without causing damage. You can add interior oven cleaning to our services to keep every item of your kitchen clean.
From our point of view, calling professionals isn’t a sign of failure, it’s a smart way to protect your oven, save time, and ensure a truly thorough clean, especially for heavily used or neglected ovens.
Pro Tip from Mesh Maids: Even after professional cleaning, maintaining a regular DIY cleaning routine with baking soda will help keep your oven cleaner for longer and make future deep cleans much easier.
Contact us to give your kitchen a cleaner and healthier look.
Conclusion
Cleaning your oven doesn’t have to involve dangerous chemicals or exhausting scrubbing. Baking soda offers a natural, effective, and budget-friendly solution for keeping your oven fresh, shiny, and odor-free. From making the perfect cleaning paste to wiping away grease with vinegar, this gentle method transforms your oven with minimal effort.
By following this simple step-by-step guide, you can maintain a clean and safe cooking environment in your kitchen. Try this natural method the next time your oven needs attention, and you’ll see how powerful baking soda can be. Keeping your oven clean is easier than ever, with zero chemicals and maximum results.
If your cleaning still doesn’t feel complete, don’t worry, we’re here to help. Just give us a call and book your cleaning appointment with Mesh Maids for a deeper clean.